So you have a bunch of contacts for us eh? Excellent! Here goes:
Import a CSV of contacts
Go to Contacts. You’ll see the Contact action bar (or whatever you call it, we just came up with that) above the table of contacts. If you have permission to import contacts, then on this bar you’ll see a button to “Import”.
Clicking “Import” will take you to a page where you can import contacts different ways, like from a CSV file or via Google Contacts. For now, we’re just going to talk about CSVs.
To start, click the green “Click Here” button or drag your file into the coupon-shaped area of your screen (Note: please don’t actually clip your screen).
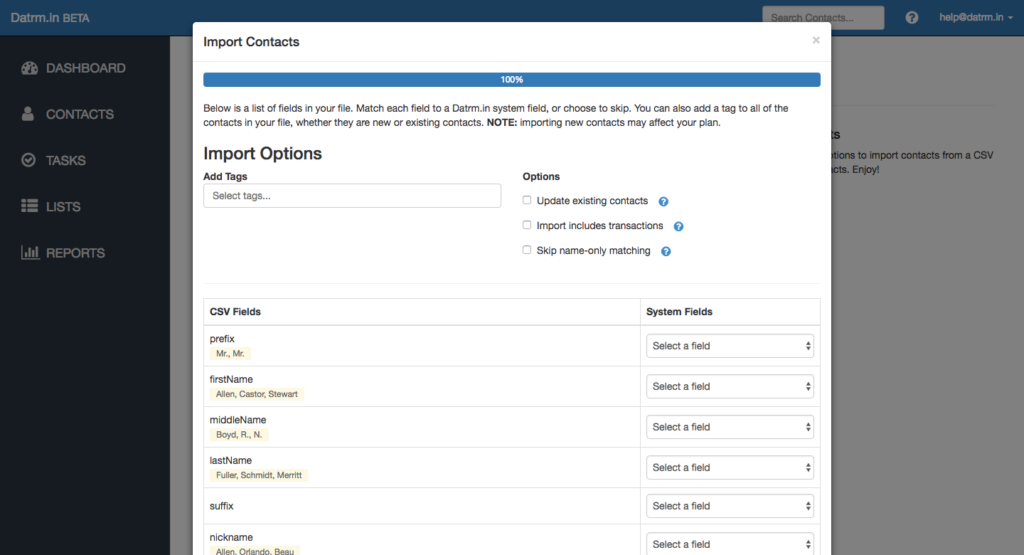
If you add a file that Datrm.in recognizes as 100% pure CSV, you’ll see a pop-up appear (or what we call a “modal” in the biz). It looks like this:
On this screen, you’ll be able to go field-by-field and make sure the inbound data from your file ends up in the correct system field. Obviously, be very careful here. You don’t want Gender ending up in the First Name field. That would make email personalization really awkward.
Here are the fields you have available to import into Datrm.in:
- Datrm.in ID
- Prefix
- First Name
- Middle Name
- Last Name
- Suffix
- Nickname
- Full/Mailing Name
- Tags
- Birthday
- Gender
- Rating
- Website URL
- Do Not Contact
- Restricted Contact
- Notes
- Company/Organization
- Job Title
- Work email
- Home email
- Other email
- Mobile phone
- Work phone
- Home phone
- Other phone
- Work Street
- Work Street 2
- Work City
- Work County
- Work State
- Work ZIP
- Work Country
- Home Street
- Home Street 2
- Home City
- Home County
- Home State
- Home ZIP
- Home Country
- Other Street
- Other Street 2
- Other City
- Other County
- Other State
- Other ZIP
- Other Country
- [Any custom fields on your account can be imported as well]
Additionally, imports with transactions can include the following fields:
- Transaction Amount
- Transaction Date
- Payment Method (allowed values: ‘Account transfer’, ‘Cash’, ‘Check’, ‘Credit Card’, ‘Online’, ‘Wire transfer’)
- Transaction Source
- Transaction Purpose
- Transaction Notes
- Thank You Note Sent
There’s a few options to set as you embark on your CSV import adventure. Here they are:
- Tags: If you want to assign one or more tags to every contact being imported in your file, enter that text here. Note that whether you choose to update existing contacts or not, they’ll receive this tag. So it’s a really quick way to drop a tag on a group of contacts.
- Update Existing Contacts: On import, Datrm.in checks for existing contacts based on name and email address. Check this box to update existing contacts. Otherwise they will be skipped.
- Skip Name Matching: Datrm.in checks several fields to see if the imported contact already exists. Checking just on the contact’s name can work for small lists but cause problems with larger data sets. Check this box to disable name-only matching.
Once you have chosen the options you want and matched all of the fields on your csv, you’re ready to import! Just click the green “Import” button at the bottom of the screen and the import process will kick off.
After starting an import, you’ll be able to watch the status of your import on the File Log at https://app.datrm.in/log.
Import Matching
We have spent a lot of time building the algorithms to make sure that when you import data, that piping fresh detail for existing contacts gets merged right in. Here’s how we match inbound contacts with your current crop of contacts:
- Datrmin ID: If you have previously exported contacts and have their Datrmin ID, you can import those existing contacts and the new updates will be connected to the existing contact. This is especially helpful if you want to pull down a batch of contacts to update names, addresses, etc in Excel in bulk fashion.
- External ID: Same thing as above. Import an external ID and we’ll look for a contact with that ID already in your contacts. Currently supported external services are: EmailOctopus, DataTrust, i360 Contact ID, i360 UID, NationBuilder ID, Salesforce ID, State Voter ID.
- Email: Matching on email is… imperfect. So we try a few different things. If you are just importing email but no name fields, we look for a match just based on email.
- Email + Name: If you provide both email and name, we will look for a contact match using both.
- Phone + Name: Can Datrmin match a list of phones? Of course we can! But it requires a name. Just matching on phone number alone is too messy.
- Name: If you just give us a name but no email, well, okay, we’ll give it a shot, but know that this could get messy. That’s why we have the “Skip Name Matching” option. If you have a large audience, for your own good please always check “Skip Name Matching” on imports.
Importing Tags
Tags are amazing, so we want you to bring all of that awesome data into Datrm.in. To import a CSV column with tags, it needs to be separated by commas or semicolons.

